If you're interested in making the casement window itself, go here. This is the second half of a tutorial on making really authentic dollhouse miniature windows. I've been experimenting with this technique for a bit, and I think it works really well. Windows have always been a thorn in my side; commercially available products just don't cut the mustard. They usually aren't very well detailed, and take whatever project I'm working on completely out of scale.
Enter: lead tape. Yes, the same stuff golfers use to weight their clubs. You can get a roll of it online; I got mine on Amazon. The other supplies you'll need are,
- A double-end ball stylus; I like the Kemper DBSS. You can buy it here. Kemper makes really nifty tools, and a decent stylus is a terrific investment. It only costs three dollars!
- A paper pattern. I got mine by trolling the internet for pictures of window patterns I liked, and then resizing it on my computer. You can also draw your pattern freehand.
- DecoArt "Triple Thick" Brilliant Brush-On Gloss glaze. You can buy this at Michael's (or any big box craft store). I'm sure you can also find it online. Trust me, it's worth searching out the right materials. For clear, wavy panes--such as one finds in real old houses--this works the best. I know; I've tried several different glazes.
- A self-healing cutting mat.
- A metal ruler.
- A really sharp x-acto knife. I always buy extra blades every time I'm at the craft store. They dull very quickly--especially when you're working with a difficult material like lead.
- A window!
And now...

The first step is to cut out the pattern so it exactly fits inside your window pane.

I copied several different patterns I liked.

Here, I've fitted the pattern inside. It goes without saying that you should completely finish your window before moving on to this step! This window, in case you're interested, is a casement window I purchased from Hobby Builders Supply.

This is lead tape. It's real lead. Be careful. Your next step is to cut off a piece and, from that, cut off a very thin strip, about 1/32" thick. The first few times you try this, it'll be pretty disheartening. After you've practiced awhile, though, you'll find that the process gets much easier. I cut my strips freehand.

Pull off the backing, and begin to lay the lead along the lines in the pattern. Use your stylus to gently press it in place. The tape has an adhesive backing, so it'll stay where you put it.

Here, I've laid a couple of strips.

It's slow going, but the learning curve is very steep. Don't be discouraged! You'll be making Tiffany-style windows in no time.

It's OK if the lines get a little messed; real lead paned windows weren't perfect, either.

Keep laying your strips...

Now, you get to start going the other way!

Using your stylus, press the crossed pieces together to form a joint.

Here's the first side completed!

And here it is without the pattern.

Now, flip it over and do the other side, matching the lines to each other as exactly as possible. It really is very important to do both sides. This is part of what creates such a level of realism.
Now, both sides are done.

Isn't it cool?

Occasionally, you'll look at your completed lead lights and something will seem out of place. You can use your stylus to mush the lines around a little bit. Make sure you're happy with how everything looks before you move on to the next step!

Now, do the other side. I know, I know, snore. But, really, it'll be so worth it in the end. And, you know, if you find this really boring, it's a great way to keep your hands busy while watching TV, etc.

Now, all four sides are complete.

Almost done!

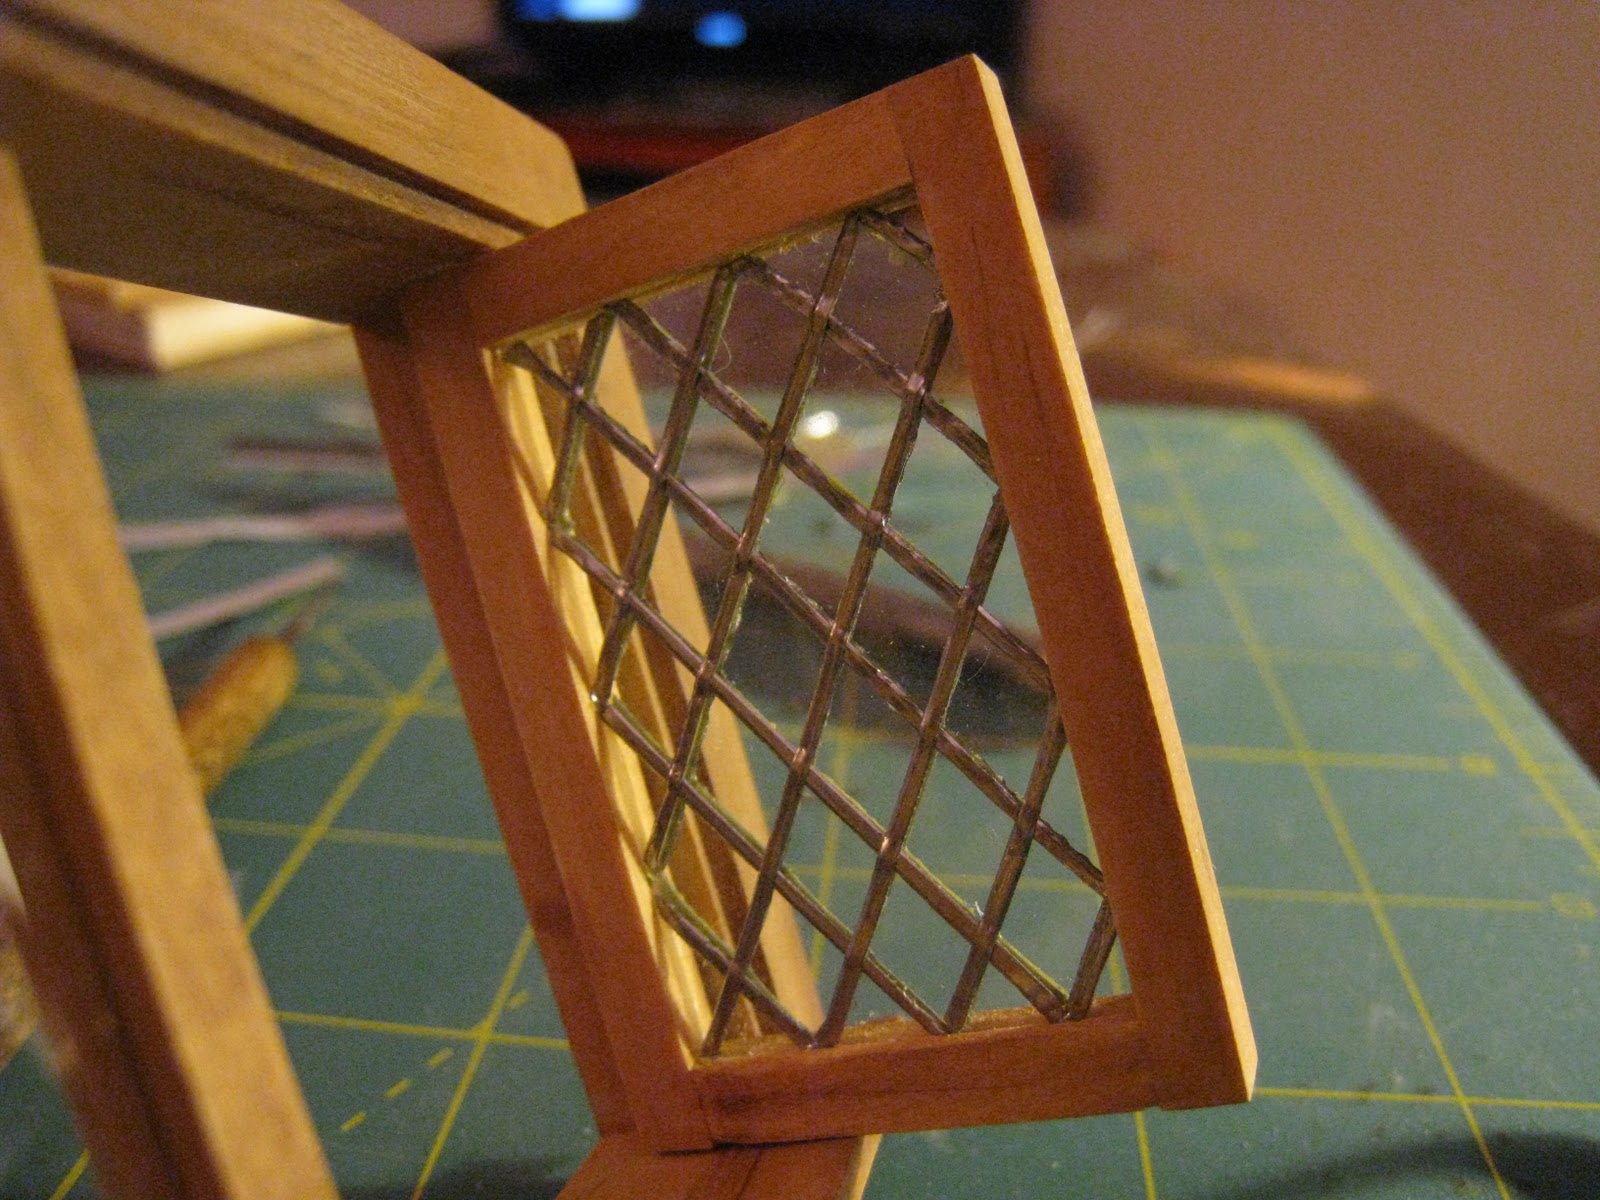
The window looks pretty good, but not great. It won't be great until you glaze the panes. In this tutorial, I'm just making very simple clear panes. If anyone's interested, maybe later I can do a tutorial for stained glass?

I love this stuff. Using a very small brush (I prefer a pointed tip), gently fill in each pane. Go slowly and carefully, making sure the glaze touches each each edge completely. Otherwise, the glaze has a tendency to pull away from the lead.

Here, the right side is done and the left side isn't. I'm showing you the window like this for the purposes of contrast. Glaze really does make a difference.

It's wavy, just like real (antique) glass.

I like the way the light streams through.

And there you have it: the beginning steps. Of course, you'll want to glaze both sides, front and back. Then, let your window dry completely--ideally a full 24 hours. I like to do the front, then let it dry overnight before flipping it over to do the back, and then waiting another day before installing the window.
What do you think?
26 comments:
Great tutorial! Thank you, the windows look great.
Victoria ❤
What a great tutorial! :o) really good pics and easy to follow too, thankyou x
HOLY COW!!! I keep thinking you have impressed me as much as you can, and then you pull a stunt like this... I am speechless! This is amazing
Hi, just found your blog through Victoria who knew I was attempting Tudor windows and wanted to have a go at leading.
Great timing for me and I would love to see how you approach stained glass windows. I have tracked down the glaze in the UK too, this product looks great but I am sure you have made it look easy!!
Fabulous tutorials, it is sooooo helpful when artists like your self share ideas and techniques. I like to collect from all sorts of artisans but I do like to have a go as well.
Looking forward to having a lovely read of your whole blog.
What a wonderful blog! Thanks to Victoria I too have found you! Fantastic tutorials too!!!!!
I have been dying to make my own leaded light windows for ages, I have a UK source for the Golfers lead tape and found a UK source for the DecoArt Gloss Glaze too! :o))))
Thank you for sharing!
Michelle :o))
Everyone, thank you so much!!! I'm glad you all like it! I love sharing techniques (and love when people share theirs with me). As for sources, I'm actually thinking of writing a post about where to find things...
Wow! WOW! Thank you! I will now know how to make my NEXT leaded glass windows! Those are so perfect! I really appreciate your detailed tutorial! I was going to comment yesterday but was on another computer! :) These make my painted glass ones look really beginner! :)(Which they are!)
So kind of you to share this. Great tutorial indeed. The windows look so perfect!
Sell WoW Account
Un tutorial genial y con unas fotos muy buenas. Gracias por compartirlo!!!
This is brilliant its tough enough doing it on big windows wowser x
I have an antique cabinet door with lead glass where several panes are broken. Any ideas of how I can "fix" it without actually having all the panes of glass recut?
While many debt settlement firms have obtained excellent results through debt settlement using tested and tested procedures, but like a good surgeon can't guarantee the issuing of a mathematical process, most can't guarantee what each village with your various creditors will be. Reputable firms have consistently brought about some very positive success stories for their clients, and while past performance is a full index of the events you may anticipate, it is certainly no guarantee of future outcomes.
Debt settlement attorney Massachusetts
Hello. This looks superb. I am doing a Jacobean house and want to try this. Which brand of tape do you recommend?
I LOVE this tutorial!! Thank you!! I found it and am now following you here and on Pintrest!!!
Thanks for sharing your knowledge. I will definitely be trying the glaze. ; )
I hope u don't mind answering a Question. I am using wire mesh and not hand laying lead. The mesh will only b on the exterior of window. But I would still like to use the glaze on the exterior in the mesh cells. Do u think it will look ok from the interior? I'm simplifying my build project in order to finish while I'm still alive. Lol thanks luvvy! Please respond at keytomyworld.com. Thanks again.
I am very happy to visit your site and i did like it. I was able to get some informative topics. keep it up and you can also visit my site for your reference. Thank you and have a good day.
n8fan.net
www.n8fan.net
This tutorial is awesome helpful! Thank you.
Can't figure out how you are getting the dimensional look on the lead tape, after you lay it down. Mine just looks flat, even after working it with the stylus.
I am also making some lead glass windows. I am using this stuff the nail salons use. It works great. Comes in a roll. Has adhesive backing. Very clean lines in metallic gold or silver. They seal it with nail polish. I haven't sealed it yet.
Michele have you tried the superglue for nails? It never dries in the tube and has a pointed tip! Loved the tutorial! So many years later and crafters are still learning from you!
I can't wait to try this on my new project!
Someone has stolen this tutorial.. Xraymachines. Info
I’m trying to make stained glass windows but having the hardest time cutting the lead tape into even 1/32” strips. Any tips?
I've used this technique in the past. I painted my lead strips to have more of a wrought iron look.
I did not attempt to cut my strips, but ordered the size I needed from Amazon.
Shit
Post a Comment