Preparing for the overhaul...

Tuesday, August 16, 2011

Finishing the Fireplace Column

At long last, I was ready to finish the fireplace column...

It was somewhat challenging, figuring out how to clad this.  Luckily, the bricks fit perfectly on the front face without any shortening.  The sides were a different story...

The brick corners tend to "twist" slightly when you glue them on...

Here's the chimney column at the halfway point.

Everything's drying...

Here it is!

Everything fits!

Not too shabby.

It's important to seal the bricks, whatever brand you end up using.  Richard Stacey recommends using a 50/50 ratio of water and PVC on theirs, but I tend to prefer a slightly higher concentration of PVC.  I also usually apply two coats (leaving some drying time in between).

I left it alone to dry overnight.

Then I grouted it.

I touched up the "stone" areas that'd gotten a beating throughout this process.  They're lighter, here, because they're drying.  I'm quite pleased with how everything came out!  This is my first "stone" fireplace.

Then, I used some slightly thickened "stone" mixture to touch up the gaps on all the "stone" sections, the fireplace as well as the ovens, etc.  I'm showing you the ovens, here.  They're still drying.

...And more drying.

No more gaps!  I removed excess "stone" goo with a detail brush dipped in water.  This is the same technique I used on the stucco.

And there's more to come...

Thursday, August 11, 2011

Thanks, Michelle, For Bringing Up Some Good Points

Michelle, one of my readers, has asked several excellent questions, as well as provided some expertise of her own.  As I'm sure her thoughts will be of interest to other readers, as well, I'm addressing them in a separate post as well as in the "comments" sections of the relevant posts.  If anyone else has any questions or suggestions, please let me know!
  1. What kind of stucco are you using between your beams?  Inside, I'm using wallpaper.  I purchase mine from Miniatures.com, although you can also purchase it on Amazon.  The correct name is "simulated off white plaster ceiling paper".  It's actually vinyl, so it's quite easy to work with.  I use Grandmother Stover's Glue to apply it, but any high quality paste should work just as well.  I apply the paper over the entire room, then glue the beams down on top.  I've had great success with this method, principally because it provides very clean lines.  It's exasperating, cutting paper exactly to shape after you've installed your woodwork.  Outside, I'm using Greenleaf stucco powder mixed with craft paint.  I like DecoArt in "antique white", but any decent craft paint will do.  I mix to roughly a 50/50 ratio.
  2. Are your houses 1:12 scale, or are your cats just huge?  Henry and London are just huge.  Henry is actually larger than London, the gent relaxing in the pictures!  Both cats weigh several stone each.  
  3. Do you have any advice for making golfer's tape curve?  Honestly, it is a bit tricky--but the good news is, the learning curve is steep.  What I found worked the best was a) cutting the tape very thinly, and b) using a much longer strip than I needed.  If I had one side firmly anchored, I found it was easier to move the strip itself about a bit.  For the more acute curves, I nudged the tape into shape bit by bit.  A set of polymer clay styli are absolutely critical for this step.  They're inexpensive, easily found in most craft stores (and certainly online--Amazon carries them), and really help with the tricky bits.  When I purchase golfer's tape, I purchase the thinnest tape I can find, because I only use the edges.  Each length of tape, thus, provides me with two edges.  If you examine a roll carefully, you'll see that the edges are slightly crimped; by cutting off those edges, I create a nice curve.  Also, it's much easier to gauge distance by eyeballing, which not only saves time cut also increases accuracy.
Michelle has also suggested a fabulous hardware vendor, Tony Hooper Miniatures.  Thank you for this suggestion, and I look forward to perusing the site at length!  Indeed, as I have the rest of the afternoon off...

Happy mini-making, everyone!

PS: I've updated the "tutorials" page, reorganizing it so tutorials on different subjects are easier to find and identify.  As always, the list is still growing!  Please let me know if there's anything you wish I'd discuss, or discuss more...

Tuesday, August 9, 2011

Bricks, Lead Glass Windows, and Cats

I've been working on this dollhouse while my real house gets torn apart.  I took advantage of the fact that our kitchen wasn't long for this world to get the grouting done.  Awesomely, I didn't need to worry about dropping bits of grout onto the floor.  Huzzah!  Now, as my kitchen goes the way of the dodo, I'm hiding in our new den (home of my new aboveground workspace) and updating you on my (somewhat questionable) progress...

I fitted a pattern for the panes.

I used my table saw to cut the plexiglass.  I don't really recommend this approach, unless you're proficient with power tools.  There's a lot of backwash, and it can be dangerous.  And wear safety goggles!  Another practical tip is, please don't remove the protective backing until after you've cut your pieces to size.  It's there to protect the plexiglass from scratches, but also to keep it from fracturing while it's being cut.

This is the same pattern I posted the other day.

I taped the half-done window back in place, while I worked on the others.  Just like I did with the stained glass window, I'll trim the lead after I've added the "glass".  But, in the meantime, I don't want to get dust on anything...and there's been a LOT of dust.  I went down to the basement today, after everyone had wrapped up for the day, and was so discouraged.  There's this horrible, thick coating of construction bits on everything.  It'll be horrendous to clean.

I did half of the larger window while watching Little Fockers, which was hilarious.

I grouted this wall--which was quite difficult, as it had so many nooks and crannies--and then glued in the oven components.  I used a piece of scrap wood to press the top of the oven down, because it was showing a tendency to pop up.

I attached the fountain bit by bit, letting each piece dry before I attached the next one.  The weight of the individual components meant that they tended to bow out otherwise.  For, essentially, gluing, this was a challenging project.  If you'd like one of these fountains for yourself, by the way, it's made by Henry Bart and available at Swan House DIY.  It looks even more beautiful in person than it does in these pictures.

It's getting there!  The pediment came, so I'll have to work on that, next.  I'm still not entirely sure what I want the door frame to look like...and I'm still looking for the perfect door hardware.  Any suggestions?

And here's the fountain.

And now I'm back to working on the chimney column.  Hopefully, I'll get a chance to work on it tonight after dinner.  It's nice, having a space where we can get together as a family and pursue our separate hobbies!

This is "my" end of the room.

The cats love it.

London has made very special friends with this house, and spends a good portion of every day guarding it.

"What are you looking at?"

He literally spends most of his time with it--wherever it is.  He seems to approve of the new location, although he spends more time looking at the dollhouse than out the window.  So go figure.  I guess he came to the right house.

My downstairs work area, which is currently bathed in construction detritus.  I have a lot of stuff, and a very small space in which to both store it and work with it.  Good organization has been key.  If anyone is interested in a post on organization and space-related challenges, let me know!

I've laid everything out, in the fond hope that I'll actually get to do something.  That little basket is actually meant for scrapbooking, but I find it's perfect to carry around all my basics--craft knives, epoxy, rulers and speed squares, whatever paint I'm currently working with, etc.  It's truly amazing how much one of these things holds!  I also particularly like the fact that I can keep everything organized, and, if anyone makes an unexpected pit stop (which has happened quite a bit lately, actually!) I can quickly pick it up and hide it, er, put it away.

Saturday, August 6, 2011

A Word On Mortar

I had a horrendous experience the other day, with a so-called mortar product.  Previously, I'd always used plain old mortar--you know, for full-sized people.  In fact, my favorite brand has always been plain old Home Depot store brand pre-mixed grout.  I favor "Delorean Gray" as a color.  So-called "dollhouse grout" tends to be too sandy for me.  

However, the house I'm working on now is the nicest thing I've done in awhile, so, as I was preparing to grout the walls, I began to wonder: am I selling myself short, here?  Will plain old store brand grout make my project look less than exciting?  Is there a better product I could be using?

I did a little investigating, and it turns out that Greenleaf stucco powder can also (supposedly) be used to create grout.  I mixed the powder with a little gray paint and--breaking one of my own cardinal rules--slapped some on.  Luckily, I'd begun this miserable experiment on a movable piece.  I spent the next ten minutes running it under the faucet, trying to scrub off the horrible goo with a toothbrush.

First, the stucco powder turned my gray paint blue.  I realize that's not what's supposed to happen, but oh well.  Second, it was like tar.  It absolutely would not release from the bricks--which had been properly sealed, and which I've never had any trouble with before--no matter how hard I scrubbed.  Second, it was shiny!  And I don't mean shiny because it was wet, either.  The surface was all wrong for grout; honestly, it looked and felt like plastic.  Whatever applications this supposed "grout" may have, they're not among the traditional.

So, after letting everything dry--and there are still a few areas on the fireplace I'll need to touch up, most likely after it's installed--I returned to my old standby: real grout.  I must say (and I'll be posting pictures shortly, if anyone's interested) I'm extremely happy with how it's come out.  It seems a shame to muck up something as painstakingly realistic as Richard Stacey bricks with a grout that doesn't pass muster.  Incidentally, Richard Stacey sells their own line of mortar, but I've never tried it.  I actually began using Richard Stacey bricks years ago, after purchasing a packet at a local store.  The carry costs were too high, the store owners had concluded, so they were selling off the last of their stock at a cut rate.  I took it home, made a fireplace, and was overjoyed.

Since, at the time, I was unaware of Richard Stacey's complete line of products--indeed, the only association I had was rather negative.  A teacher of mine, a real wank, possessed the same name.  Having no notion that other types of grout existed--but knowing, from previous experience, that so-called "dollhouse grout" was all awful--I used the regular stuff.  And I was pleased!

So there you have it.  Maybe some of you have had good experiences with this product, in which case I'd like to hear about it.  What sorts of grout do you favor--and why?

Wednesday, August 3, 2011

Stained Glass Window Print-Outs

If you're interested in creating windows similar to the ones in the tutorial, these are the patterns I used:


You can download the images, and size them to fit your window projects.  I hope this is helpful!  This latter design, for the diamond panes, is the same pattern I used for both the original diamond paned casement windows, and the windows on the Tudor Bakery.  I just resized it differently.

Tuesday, August 2, 2011

How To Make An Authentic, Realistic Looking Dollhouse Miniature Stained Glass Window

Most so-called "stained glass" for dollhouse miniature applications is complete rubbish.

For a very minimal investment, you can make your own.

You will need:

  1. Lead golf tape (for more on where to buy this, and other supplies you'll need, check here)
  2. Either a pre-made window, or one you've made yourself.
  3. If you're making your own window, as I've done here, you'll need to purchase some plexiglass.  I've used 0.03 mm plexiglass, which is thick enough to be substantive, but thin enough to cut with a craft knife.  I purchased mine on Amazon.
  4. Bombay India ink.  If you want to replicate the look I've created here, you'll need blue, violet, cherry red and teal ink.
  5. Deco-Art Triple Thick Brush-On Glaze.
  6. One or more very fine brushes.
  7. A craft knife (and many replacement blades!)
  8. A metal ruler.
  9. A polymer clay stylus.
I apologize to those of you who've been waiting for this tutorial.  I know it's taken a long time.  If you're new to the blog, please check out my first glass tutorial here.  I explain how to make a diamond paned window.  A stained glass window is slightly more challenging but, believe it or not, not much more!  The most challenging aspect of this project is curving the lead tape to create your design.  With a little practice, though, it gets much easier.  This was my first stained glass window, and I must say, the learning curve is very steep.  Don't be intimidated by the idea of creating stained glass!

First, finish your actual window.  Once you've inserted the glass, you really won't be able to.  Then, if you're using a window you've made yourself, cut a piece of plexiglass exactly the right size to fit in.  The fit should be snug, but not so tight that the plastic warps or bends.  If you need to, glue it in place with some very tiny drops of epoxy.  During the course of leading this window, my plexiglass shifted around a tiny bit, but I just pushed it back in place and continued on.

Then, cut your pattern to fit, and tape it in place.  I found this pattern on the internet.  I copied and pasted it into a Word document, then shrunk it to size.  I used painter's tape to fix it in place.

Make sure your design is taped in place securely.

Now, start leading!  For a complex design like this, it's especially important that you cut thin strips of lead.  Making the curves is a little challenging at first, but it does get much easier.  I use my fingers, and my polymer clay stylus to push the tape into place.

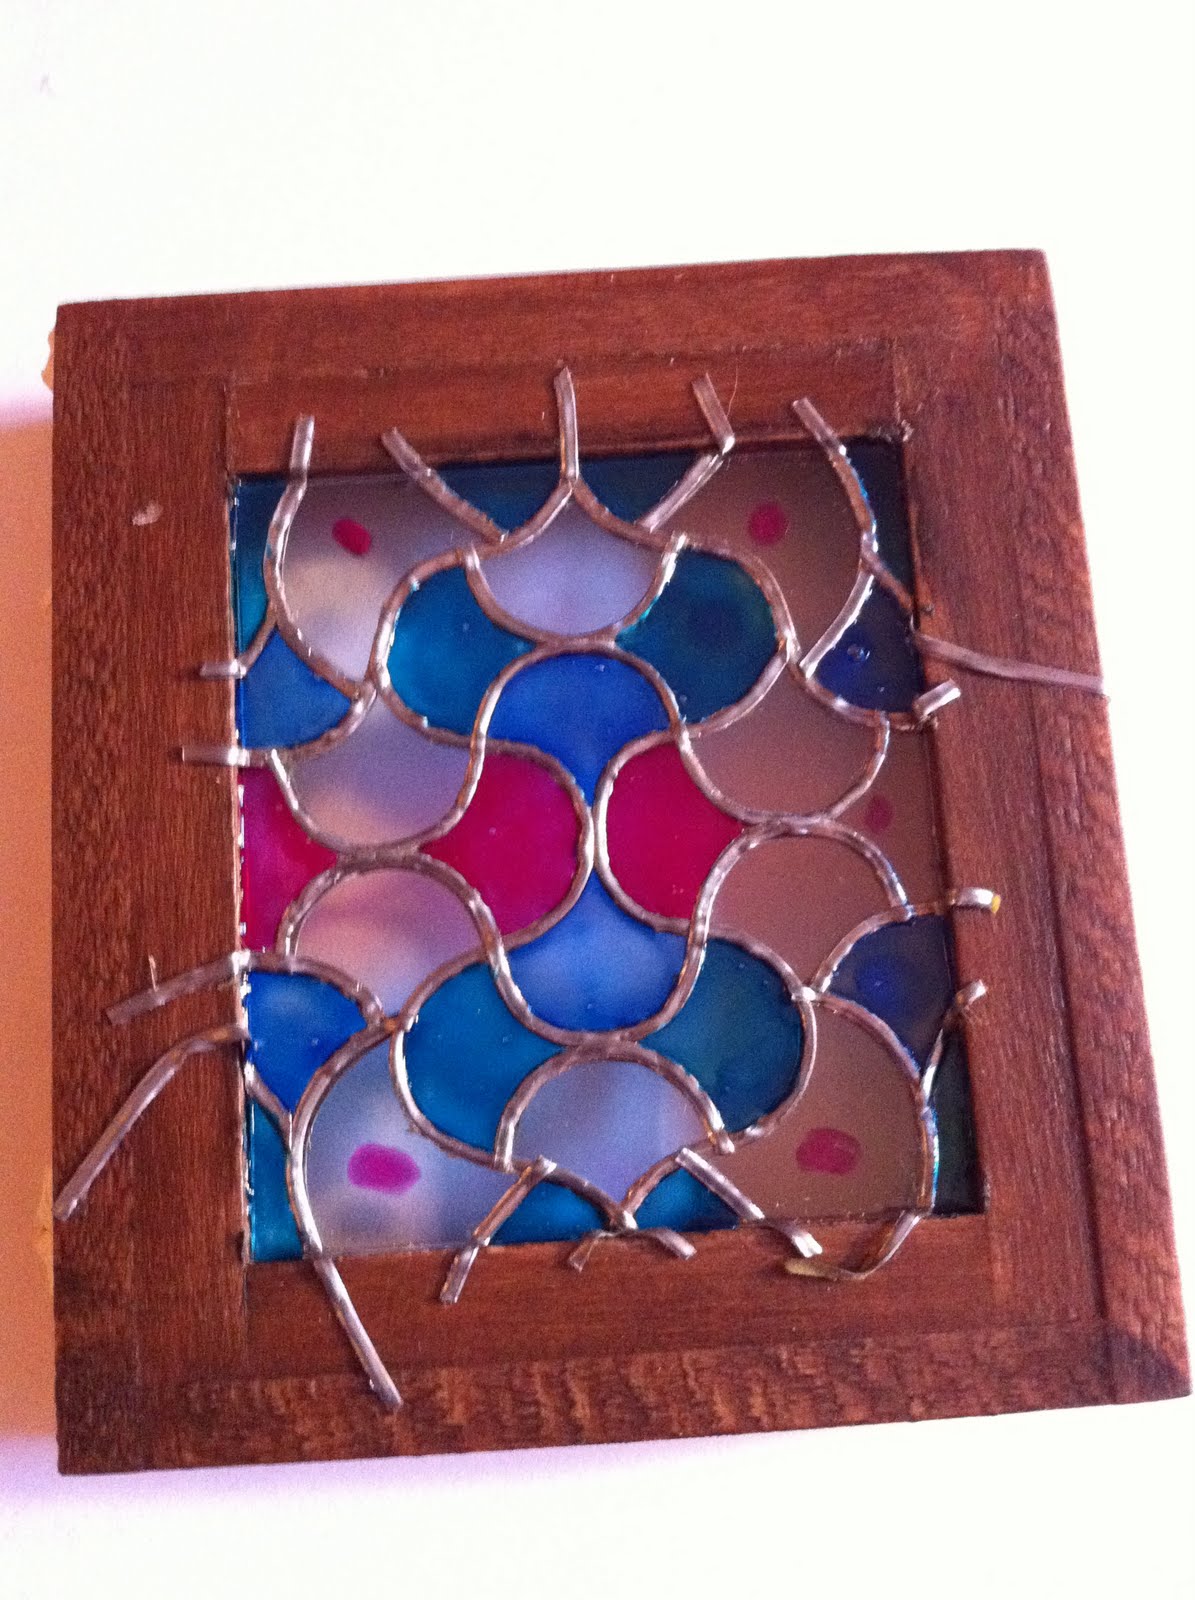
I've finished one side.  I like to leave the loose edges on, and cut them off right at the end, as the last thing I do.  It helps secure the plexiglass in place, as well as makes sure that the plexiglass is fully covered.  It's very easy to cut your tape too short, if you're not careful!

Here's the window without the pattern.  Notice, in the background, that I'm using a self-healing cutting mat.  These things are wonderful--they save your blades, and your furniture!  They're inexpensive, and available at your local craft store.

Here, I've finished leading the other side of the window.  Take especial care to make sure that your lead matches up; you shouldn't perceive any overlap.  It should look, when finished, as though it's one single strip of lead.

Now, you're ready to add the "glass"!

Make sure you're 100% happy with your design before you start on the next step.

I purchased my ink from Jerry's Artarama, but you can find it in most catalogues and art stores.  I like Jerry's for their reasonable prices.  Although you certainly can buy colors singly, I like getting the whole wheel--you save money, and you get more options!  Also, too, sometimes inks just don't look the same mixed into your glass medium as you think they will.  When I was making this window, I initially tried magenta instead of crimson, but when I tried it on my plastic test piece, I thought oh, yuck.

Add a little glaze into your dish, and add a drop of ink.  Remember, you can always add more ink, but it's a lot harder to take some out!  Here, I'm mixing the turquoise ink.

Mix your ink into your glaze.

Try your ink out onto your test piece.  I like to save the packaging that commercially made windows and doors arrive in, and use that.  As you can see, I added progressively more ink until I arrived at a tint that I liked.

See how dark it looks in the dish, versus how light on the plastic?  You'll also notice a difference when you hold your test plastic up to the light.  Play around a little bit before you put brush to window, to make sure you like what you've mixed and are getting the result you want.

Now, start painting!  I use a tiny brush for this, the smallest I can find.  In some spots, I had to go back and add a touch more later on, so each pane would look even.  A little unevenness is desirable--real stained glass has a "swirled" look--but too much of a good thing just looks sloppy.

I did a little "paint by number" to help me remember which pane got which color.  As I started on each new color, I just lightly tapped my brush against each pane that would receive that specific tinting.  The larger the window, and the more complex the pattern, the easier it is to get confused!

Here, the window is almost done.  It looks quite opaque, as there's no light behind it.  Like all stained glass, it needs light to bring it to life.

This is the time you want to put your window down and walk away.  Don't do anything else until it's had a chance to dry!  I recommend waiting at least an hour.

Now, very carefully use your craft knife to trim away the excess lead.  I score the cut, then use a pair of tweezers to very gently pull the excess lead away.  If the lead doesn't remove easily, make sure your cut is fully scored--you don't want to pull the actual window leading away.

Here's the window, with light streaming through.  It's still rather dark, as I finished this window and took this picture during a thunderstorm.  I'll post a few more pictures when it's brighter!

And now the window is installed.

And here's a view from inside.