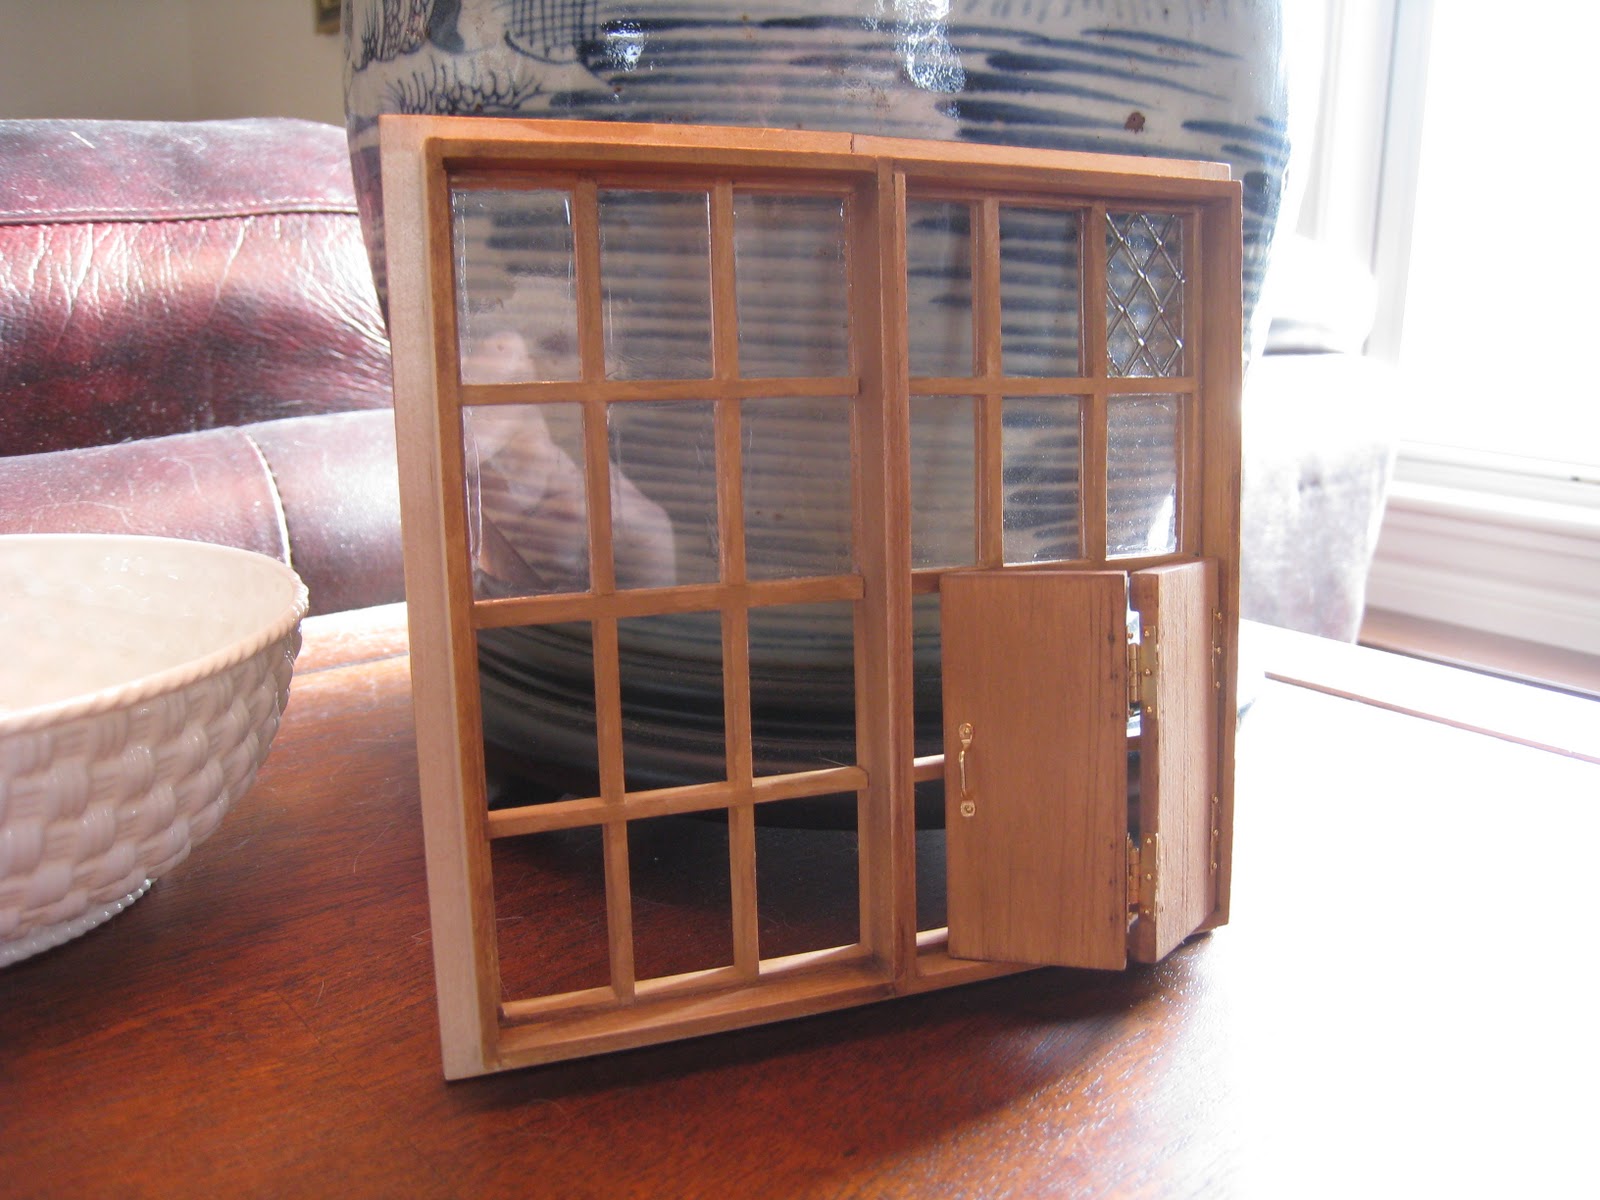
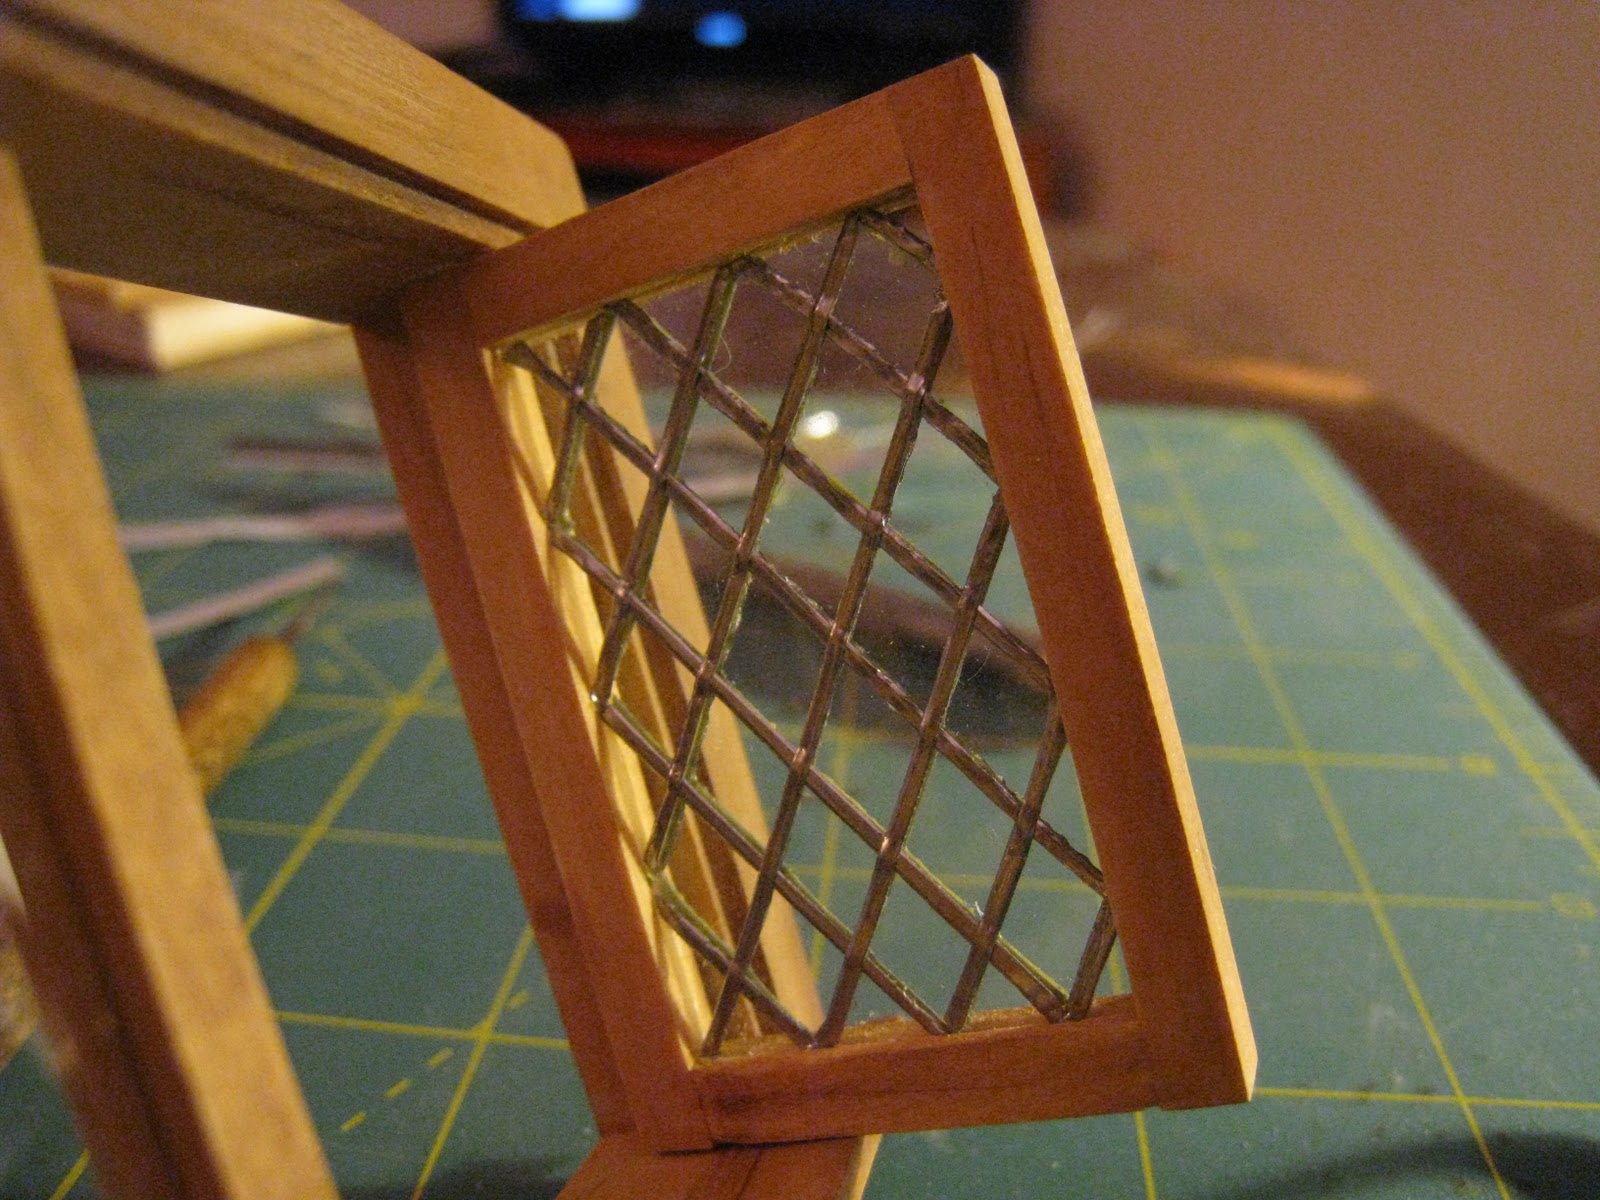
Preparing for the overhaul...
Showing posts with label window. Show all posts

Tuesday, August 2, 2011

How To Make An Authentic, Realistic Looking Dollhouse Miniature Stained Glass Window

Most so-called "stained glass" for dollhouse miniature applications is complete rubbish.

For a very minimal investment, you can make your own.

You will need:

  1. Lead golf tape (for more on where to buy this, and other supplies you'll need, check here)
  2. Either a pre-made window, or one you've made yourself.
  3. If you're making your own window, as I've done here, you'll need to purchase some plexiglass.  I've used 0.03 mm plexiglass, which is thick enough to be substantive, but thin enough to cut with a craft knife.  I purchased mine on Amazon.
  4. Bombay India ink.  If you want to replicate the look I've created here, you'll need blue, violet, cherry red and teal ink.
  5. Deco-Art Triple Thick Brush-On Glaze.
  6. One or more very fine brushes.
  7. A craft knife (and many replacement blades!)
  8. A metal ruler.
  9. A polymer clay stylus.
I apologize to those of you who've been waiting for this tutorial.  I know it's taken a long time.  If you're new to the blog, please check out my first glass tutorial here.  I explain how to make a diamond paned window.  A stained glass window is slightly more challenging but, believe it or not, not much more!  The most challenging aspect of this project is curving the lead tape to create your design.  With a little practice, though, it gets much easier.  This was my first stained glass window, and I must say, the learning curve is very steep.  Don't be intimidated by the idea of creating stained glass!

First, finish your actual window.  Once you've inserted the glass, you really won't be able to.  Then, if you're using a window you've made yourself, cut a piece of plexiglass exactly the right size to fit in.  The fit should be snug, but not so tight that the plastic warps or bends.  If you need to, glue it in place with some very tiny drops of epoxy.  During the course of leading this window, my plexiglass shifted around a tiny bit, but I just pushed it back in place and continued on.

Then, cut your pattern to fit, and tape it in place.  I found this pattern on the internet.  I copied and pasted it into a Word document, then shrunk it to size.  I used painter's tape to fix it in place.

Make sure your design is taped in place securely.

Now, start leading!  For a complex design like this, it's especially important that you cut thin strips of lead.  Making the curves is a little challenging at first, but it does get much easier.  I use my fingers, and my polymer clay stylus to push the tape into place.

I've finished one side.  I like to leave the loose edges on, and cut them off right at the end, as the last thing I do.  It helps secure the plexiglass in place, as well as makes sure that the plexiglass is fully covered.  It's very easy to cut your tape too short, if you're not careful!

Here's the window without the pattern.  Notice, in the background, that I'm using a self-healing cutting mat.  These things are wonderful--they save your blades, and your furniture!  They're inexpensive, and available at your local craft store.

Here, I've finished leading the other side of the window.  Take especial care to make sure that your lead matches up; you shouldn't perceive any overlap.  It should look, when finished, as though it's one single strip of lead.

Now, you're ready to add the "glass"!

Make sure you're 100% happy with your design before you start on the next step.

I purchased my ink from Jerry's Artarama, but you can find it in most catalogues and art stores.  I like Jerry's for their reasonable prices.  Although you certainly can buy colors singly, I like getting the whole wheel--you save money, and you get more options!  Also, too, sometimes inks just don't look the same mixed into your glass medium as you think they will.  When I was making this window, I initially tried magenta instead of crimson, but when I tried it on my plastic test piece, I thought oh, yuck.

Add a little glaze into your dish, and add a drop of ink.  Remember, you can always add more ink, but it's a lot harder to take some out!  Here, I'm mixing the turquoise ink.

Mix your ink into your glaze.

Try your ink out onto your test piece.  I like to save the packaging that commercially made windows and doors arrive in, and use that.  As you can see, I added progressively more ink until I arrived at a tint that I liked.

See how dark it looks in the dish, versus how light on the plastic?  You'll also notice a difference when you hold your test plastic up to the light.  Play around a little bit before you put brush to window, to make sure you like what you've mixed and are getting the result you want.

Now, start painting!  I use a tiny brush for this, the smallest I can find.  In some spots, I had to go back and add a touch more later on, so each pane would look even.  A little unevenness is desirable--real stained glass has a "swirled" look--but too much of a good thing just looks sloppy.
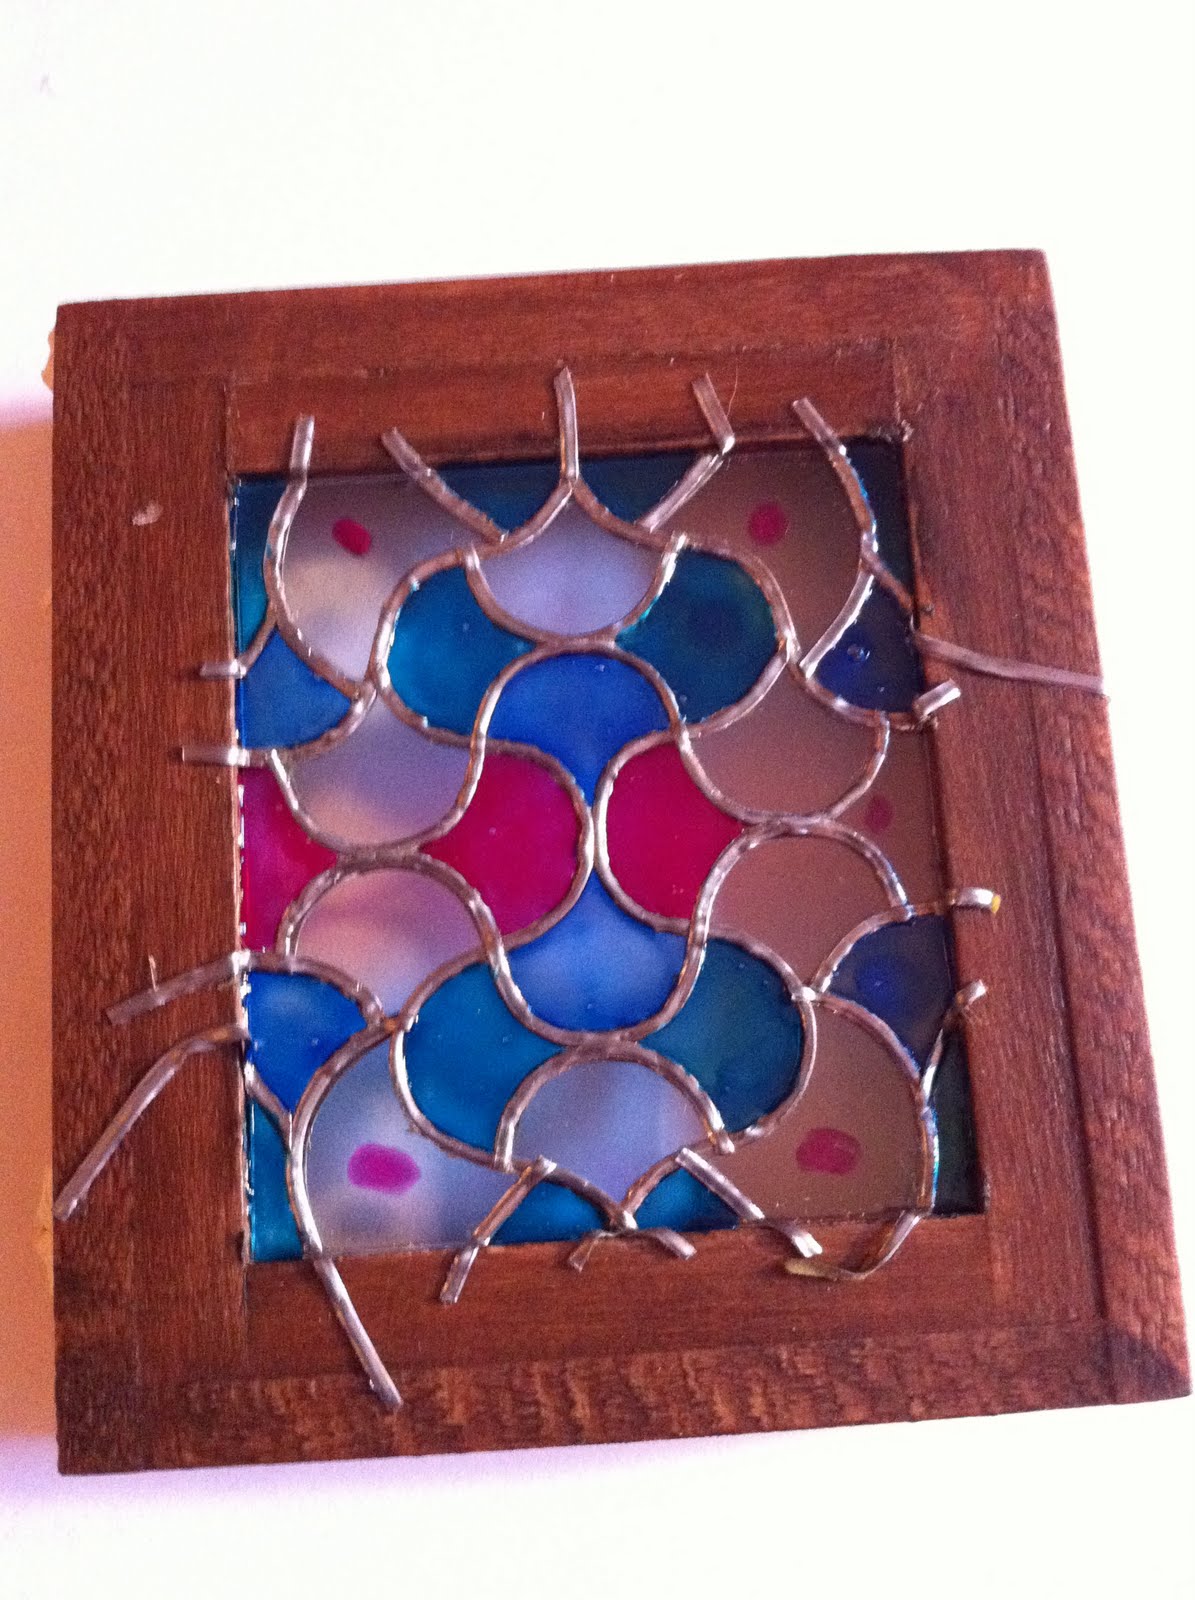
I did a little "paint by number" to help me remember which pane got which color.  As I started on each new color, I just lightly tapped my brush against each pane that would receive that specific tinting.  The larger the window, and the more complex the pattern, the easier it is to get confused!

Here, the window is almost done.  It looks quite opaque, as there's no light behind it.  Like all stained glass, it needs light to bring it to life.

This is the time you want to put your window down and walk away.  Don't do anything else until it's had a chance to dry!  I recommend waiting at least an hour.

Now, very carefully use your craft knife to trim away the excess lead.  I score the cut, then use a pair of tweezers to very gently pull the excess lead away.  If the lead doesn't remove easily, make sure your cut is fully scored--you don't want to pull the actual window leading away.

Here's the window, with light streaming through.  It's still rather dark, as I finished this window and took this picture during a thunderstorm.  I'll post a few more pictures when it's brighter!

And now the window is installed.

And here's a view from inside.

Thursday, March 24, 2011

Making An Historically Accurate Tudor Window

In tudor times, glass was a precious commodity.  Only the wealthy could afford it and, even then, hardly ever in abundance.  Commonly, glass windows were only actually glass in a small portion.  Usually that portion was the upper half, or maybe just quarter, of the window.  The rest of the window was covered by a shutter.  In good weather, the shutter could be opened to let in fresh air; in bad weather, the shutter could be closed, but light could still get in through the upper part of the window.

From the early middle ages through to the modern era, two commodities were even more precious than glass: light and fresh air.  Windows from the time reflect builders', and homeowners' recognition of their importance.  Most tudor families lived in dank squalor, but not by choice.  A window like the one I'm building would've been popular for its ability to bring what light and fresh air there was into a room.

I'm about at the halfway point with this window, and thought you might be interested in seeing where I am.  Sometimes it's easier to understand how something's built when you see it mid-progress.  This is part of a project I'm working on right now, a tudor-era merchant's house and shop.

I made the frame for this window out of two Houseworks 12-light windows.  Since the original window isn't meant to have individual glass panes, I had to cut them out of plastic.  I just used the plastic supplied with the windows.

After I fitted them in, I glazed them into place with some of my trusty DecoArt glaze.  Here, I've finished one pane, so you (and I) can see how it'll look when it's done.  The rest have just been glazed into place. I laid the lead tape right over the glazing.  I think the secret, here, is to glaze with a light hand; it's hard to disguise lots of bumps and lumps.

Here's a close-up of one of the glazed panes.

Here's a close-up of the shutters.  So far, I've only attached shutters to one side.  The weatherly side is quite a bit darker and more aged than the interior side.

I liked the double hinged effect.  The Houseworks brass hardware isn't exactly historically accurate, but it's also the best-made hardware on the market.  There's plenty of more accurate-looking hardware, but I've tried a lot of it and most of it doesn't work.  One company's products (which purport to be American Colonial but could work in a medieval or tudor setting) were really disappointing to me, because the hinges bent.  They bent so much, and so easily, they couldn't support the weight of the door.  Even swinging it closed changed their shape.  Sometimes, modeling means trade-offs, and if it's a choice between accuracy and utility, I, personally, would rather have utility.

Here's a view from above.

And here's (sort of) what it'll look like from inside.

The shutter folds up, allowing it to be put out of the way when not in use.

I added some nail holes and gouges, to give this wood the effect of having been previously used.  It's tough to remember this, sometimes, but most things were recycled.  Completely new items, made from newly fabricated materials were a luxury.

So here we are...halfway there!

Wednesday, March 16, 2011

How To Make A Dollhouse Miniature Lead Paned Window

If you're interested in making the casement window itself, go here.  This is the second half of a tutorial on making really authentic dollhouse miniature windows.  I've been experimenting with this technique for a bit, and I think it works really well.  Windows have always been a thorn in my side; commercially available products just don't cut the mustard.  They usually aren't very well detailed, and take whatever project I'm working on completely out of scale.

Enter: lead tape.  Yes, the same stuff golfers use to weight their clubs.  You can get a roll of it online; I got mine on Amazon.  The other supplies you'll need are,
  1. A double-end ball stylus; I like the Kemper DBSS.  You can buy it here.  Kemper makes really nifty tools, and a decent stylus is a terrific investment.  It only costs three dollars!
  2. A paper pattern.  I got mine by trolling the internet for pictures of window patterns I liked, and then resizing it on my computer.  You can also draw your pattern freehand.
  3. DecoArt "Triple Thick" Brilliant Brush-On Gloss glaze.  You can buy this at Michael's (or any big box craft store).  I'm sure you can also find it online.  Trust me, it's worth searching out the right materials.  For clear, wavy panes--such as one finds in real old houses--this works the best.  I know; I've tried several different glazes.
  4. A self-healing cutting mat.
  5. A metal ruler.
  6. A really sharp x-acto knife.  I always buy extra blades every time I'm at the craft store.  They dull very quickly--especially when you're working with a difficult material like lead.
  7. A window!
And now...


The first step is to cut out the pattern so it exactly fits inside your window pane.

I copied several different patterns I liked.

Here, I've fitted the pattern inside.  It goes without saying that you should completely finish your window before moving on to this step!  This window, in case you're interested, is a casement window I purchased from Hobby Builders Supply.

This is lead tape.  It's real lead.  Be careful.  Your next step is to cut off a piece and, from that, cut off a very thin strip, about 1/32" thick.  The first few times you try this, it'll be pretty disheartening.  After you've practiced awhile, though, you'll find that the process gets much easier.  I cut my strips freehand.

Pull off the backing, and begin to lay the lead along the lines in the pattern.  Use your stylus to gently press it in place.  The tape has an adhesive backing, so it'll stay where you put it.

Here, I've laid a couple of strips.

It's slow going, but the learning curve is very steep.  Don't be discouraged!  You'll be making Tiffany-style windows in no time.

It's OK if the lines get a little messed; real lead paned windows weren't perfect, either.

Keep laying your strips...

Now, you get to start going the other way!

Using your stylus, press the crossed pieces together to form a joint.

Here's the first side completed!

And here it is without the pattern.

Now, flip it over and do the other side, matching the lines to each other as exactly as possible.  It really is very important to do both sides.  This is part of what creates such a level of realism.

Now, both sides are done.

Isn't it cool?

Occasionally, you'll look at your completed lead lights and something will seem out of place.  You can use your stylus to mush the lines around a little bit.  Make sure you're happy with how everything looks before you move on to the next step!

Now, do the other side.  I know, I know, snore.  But, really, it'll be so worth it in the end.  And, you know, if you find this really boring, it's a great way to keep your hands busy while watching TV, etc.

Now, all four sides are complete.

Almost done!

The window looks pretty good, but not great.  It won't be great until you glaze the panes.  In this tutorial, I'm just making very simple clear panes.  If anyone's interested, maybe later I can do a tutorial for stained glass?

I love this stuff.  Using a very small brush (I prefer a pointed tip), gently fill in each pane.  Go slowly and carefully, making sure the glaze touches each each edge completely.  Otherwise, the glaze has a tendency to pull away from the lead.

Here, the right side is done and the left side isn't.  I'm showing you the window like this for the purposes of contrast.  Glaze really does make a difference.

It's wavy, just like real (antique) glass.

I like the way the light streams through.

And there you have it: the beginning steps.  Of course, you'll want to glaze both sides, front and back.  Then, let your window dry completely--ideally a full 24 hours.  I like to do the front, then let it dry overnight before flipping it over to do the back, and then waiting another day before installing the window.

What do you think?